


You hit a quadra kill. It’s the best clip of the week. You pull the VOD to post on TikTok, but your teammate is screaming in Discord, and Spotify is blasting a copyrighted song.
The clip is dead.
Isolating your microphone, game audio, voice chat, and music prevents this. Routing everything into separate channels gives you total control over what the live audience hears, what saves to your Twitch VOD, and what you mute in post-production.
Here is how to configure multi-track audio in OBS for streaming, recording, and podcasting.
TL;DR / Quick Rules of Thumb
- Never use OBS Application Audio Capture (BETA). It desyncs over time.
- Use virtual drivers like Elgato Wavelink 3.0 (now 100% free, no hardware required) or VB-Cable.
- Assign Track 1 to your live stream and Track 2 to your Twitch VOD.
- Set Twitch audio bitrate to 160 kbps to avoid generation loss.
- Use Apple's CoreAudio AAC encoder for the best stream sound quality.
The Trap: OBS Application Audio Capture
Before we build the right setup, we need to address the wrong one.
OBS has a built-in feature called Application Audio Capture (BETA). It lets you select individual programs like Spotify or Discord and capture their audio directly. Do not use it.
It remains in beta for a reason. If you stream for more than an hour, the audio drifts. You will experience delays, robotic glitches, and desyncs. Skip this feature entirely.
The Fix: Virtual Audio Drivers
To split audio reliably, you need virtual channels. In the past, this meant dealing with clunky software like Voicemeeter or buying expensive physical mixers.
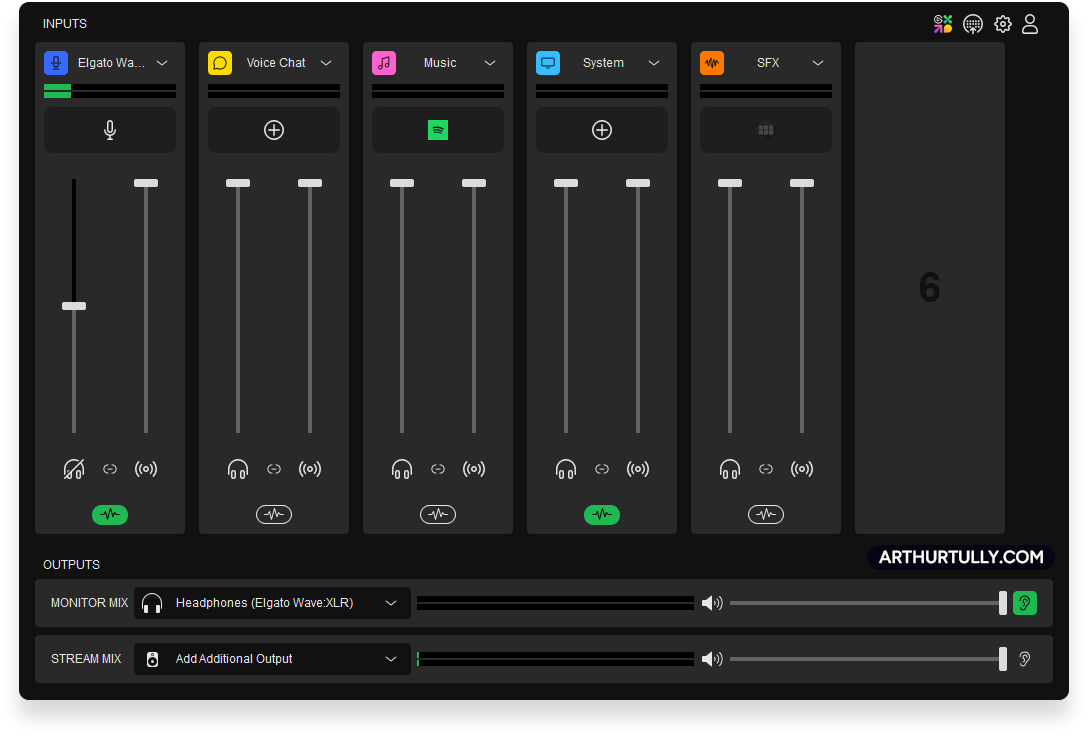
Today, the best method uses dedicated virtual drivers. Programs like Elgato Wavelink 3.0 allow you to create dummy outputs for specific audio types: Voice, Chat, Music, and System. Route your PC apps into these virtual outputs, then import them directly into OBS. Best of all, Wavelink 3.0 is now completely free and requires zero Elgato hardware.

If you prefer not to run a full virtual mixer and only want to isolate Spotify, use a lightweight alternative like VB-Cable. Install the cable, then route Spotify's output to it in your Windows audio settings. To ensure you hear the music yourself, configure the Windows settings. Open the Windows Sound Control Panel. Find the virtual cable, open its properties, and check "Listen to this device"—routing it straight to your headphones. You hear the music, and OBS gets a dedicated, isolated audio source.
The Streamer's Workflow: The Twitch VOD Track
Music on Twitch is allowed while you are live. Unless you broadcast a movie or an F1 race, you are unlikely to get a live DMCA strike. However, if that copyrighted audio saves to your recorded VOD, your channel is at risk.
OBS fixes this with the Twitch VOD Track.
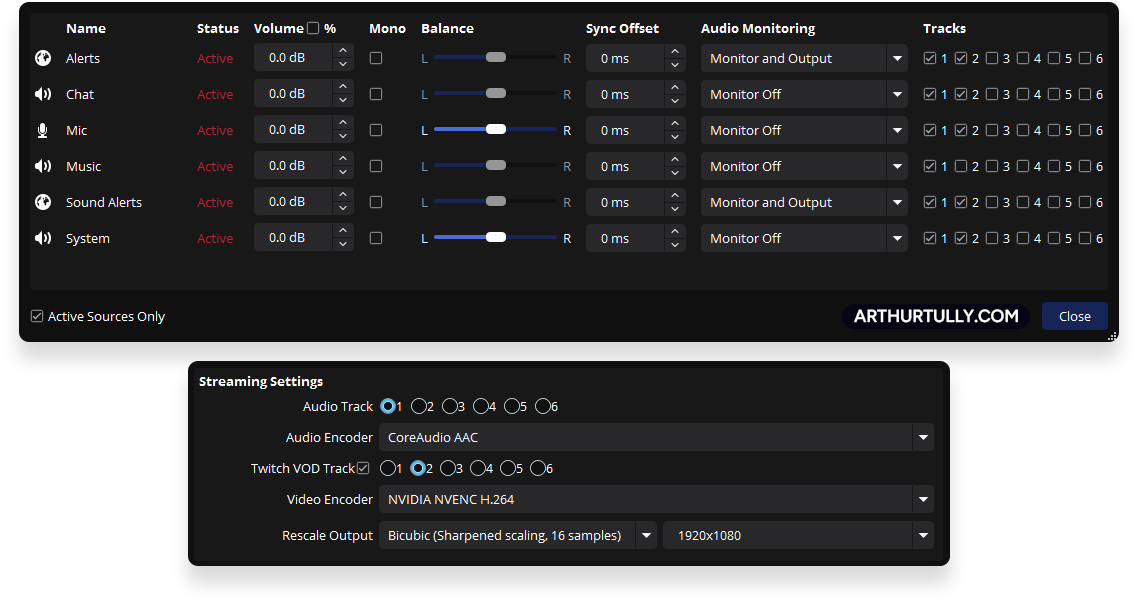
The software provides six audio tracks. In your OBS Output settings, assign Track 1 to your Live Stream and Track 2 to your Twitch VOD.
In your Advanced Audio Properties, uncheck Track 2 for your Music source. Your live viewers hear the music, but it is removed from the VOD. Your channel is safe.

The YouTuber's Workflow: Pure Recording
If you only record YouTube videos, ignore the Streaming tab. You do not need to mix everything into a single live track.
Go to the Recording tab in your Output settings and check Tracks 1 through 4. Many creators make the mistake of bundling all their audio into Track 1. Avoid this. Give every source its own dedicated track. When you drop your video file into Premiere Pro or DaVinci Resolve, you will see four separate audio layers.
Keep this organized by naming your tracks in the OBS Audio settings. Use this exact order:
- Track 1: Mic (Your voice only)
- Track 2: System (Game audio only)
- Track 3: Chat (Discord/Teammates only)
- Track 4: Browser (Alerts or YouTube videos)
If a teammate screams over your intro, mute Track 3 in your editor. The game sound and your microphone stay perfectly intact.


The Podcaster's Workflow: Multiple Mics
Podcasting brings a different problem: multiple hosts in one room.
If you mix three microphones into one audio track, you cannot fix audio bleed or apply separate EQ to someone's voice after recording.
Use Wavelink to send each microphone to a separate OBS track. Mic 1 goes to Track 1, Mic 2 to Track 2, and Mic 3 to Track 3.
Bundle your soundboard, jingles, and system audio together and send them to Track 4. Keeping these combined is the smartest play. Your in-room guests need to hear the jingles through their headphones at the exact time they route to the recording.
The "My Audio is Missing!" Panic
When you record multiple audio tracks and play the video back in Windows Media Player or VLC, you might only hear your microphone. Your game and friends will sound muted.
Do not panic. Your audio is not missing.
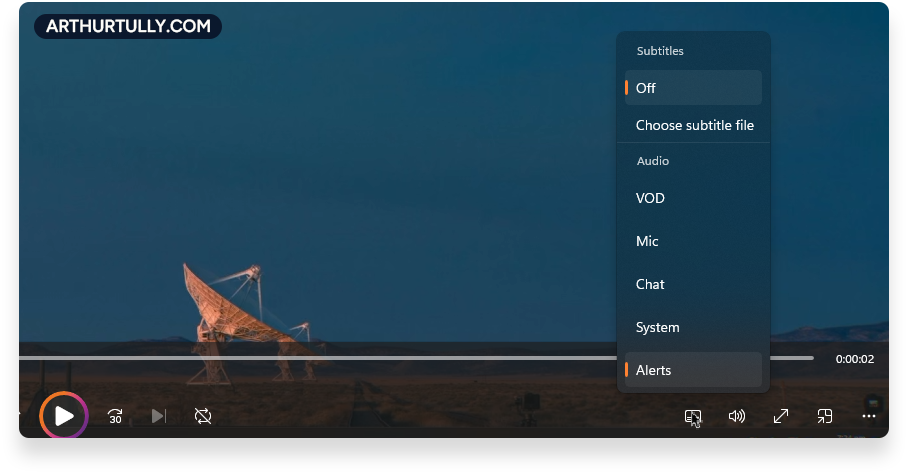
Standard media players only play one audio track at a time. By default, they play Track 1. To hear the rest of your audio, right-click the video, go to Audio Tracks, and select a different track. When you pull the file into your video editor, all tracks will appear normally.

The Bitrate Secret
Twitch allows a maximum audio bitrate of 160 kbps. If your OBS audio bitrate is set to 320 kbps, OBS sends that track to Twitch, but the audio suffers from generation loss. Your 320 kbps track will be re-encoded once more for the live stream or the VOD, producing a glitchy sound. Best practice is to use the default 160 kbps for streaming.
You have the option to use 320 kbps for your local recordings.


To upgrade the audio quality of your stream, use CoreAudio AAC. This is a superior encoder made by Apple that is supported by Twitch. You access it by installing iTunes for Windows, then selecting it in OBS.
An alternative way to install it is using AppleApplicationSupport64.msi, which was bundled with iTunes installers up until version 12.10.8.5. To skip installing iTunes entirely, extract the extra files using WinRAR or 7-Zip.
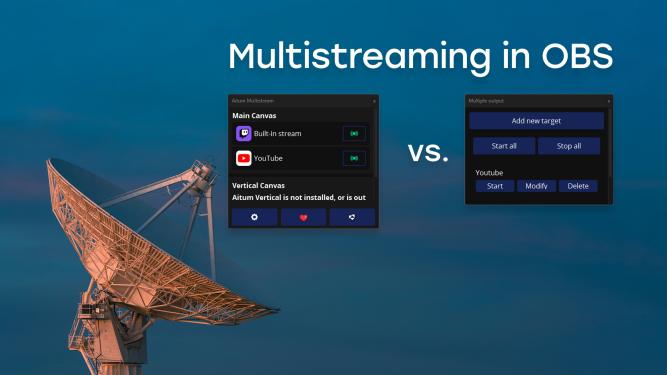
The Multistreaming Trick
If you stream to Twitch and YouTube simultaneously, copyright rules change. YouTube's Content ID system flags copyrighted music while you are live and instantly nukes your stream.
Use your split audio setup to bypass this. Send Track 1 (with music) to Twitch. In your multistreaming plugin, set YouTube to receive Track 2 (the VOD track with no music). Both platforms get the exact audio mix they require.
Stop Fighting Your Software
Proper audio routing gives you total control over your content. However, configuring virtual cables and track matrices is tedious. One wrong checkbox means your audio gets muted on stream.
If you prefer not to spend your weekend troubleshooting virtual drivers, book a 1-on-1 session with me. I will install the routing software, separate your apps, and configure your OBS tracks for your exact workflow.
I handle the config. You stream.